Ever wondered why some CNC-machined parts look flawless while others don’t quite hit the mark? The secret lies in the surface finish. Whether you’re designing precision components or crafting visually stunning products, choosing the right surface finish can make or break your project. In this guide, we’ll break down everything you need to know about surface finishes for CNC machining, complete with a handy chart and tips to get it right.
Ready to elevate your CNC projects? Let’s dive in!
Why Surface Finish Is a Game-Changer
Surface finish isn’t just about making parts look pretty (though that’s a big plus!). It’s about performance, durability, and functionality. A well-chosen finish can:
- Boost wear resistance for parts that endure heavy use.
- Enhance corrosion resistance for harsh environments.
- Ensure a perfect fit in assemblies.
- Give your product that professional, polished look.
Pick the wrong finish, though, and you could face costly rework or parts that fail prematurely. That’s where a surface finishes chart comes in—it’s your roadmap to getting it right.
Pro Tip:Not sure which finish suits your project?Ask our CNC experts for tailored advice!
Decoding Surface Finish: The Basics
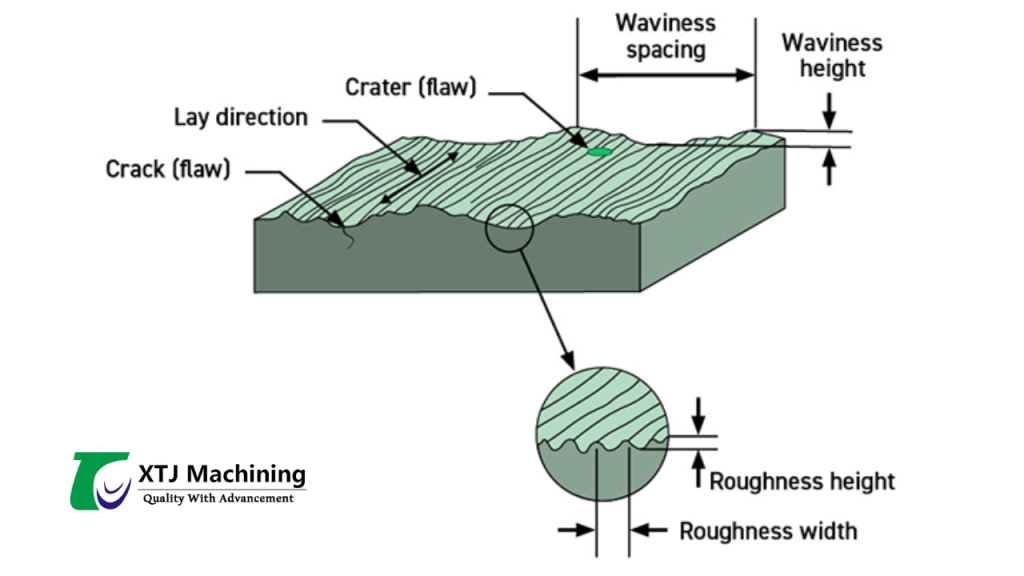
Surface finish defines the texture and quality of a part’s surface, shaped by the interplay of three core parameters: lay, roughness, and waviness. Understanding these is key to specifying the right finish for your CNC project.
- Lay: The direction of the surface pattern, determined by the machining process. For example, turning creates linear patterns, while grinding may produce cross-hatched or random patterns. Lay affects how a part interacts with mating surfaces or coatings.
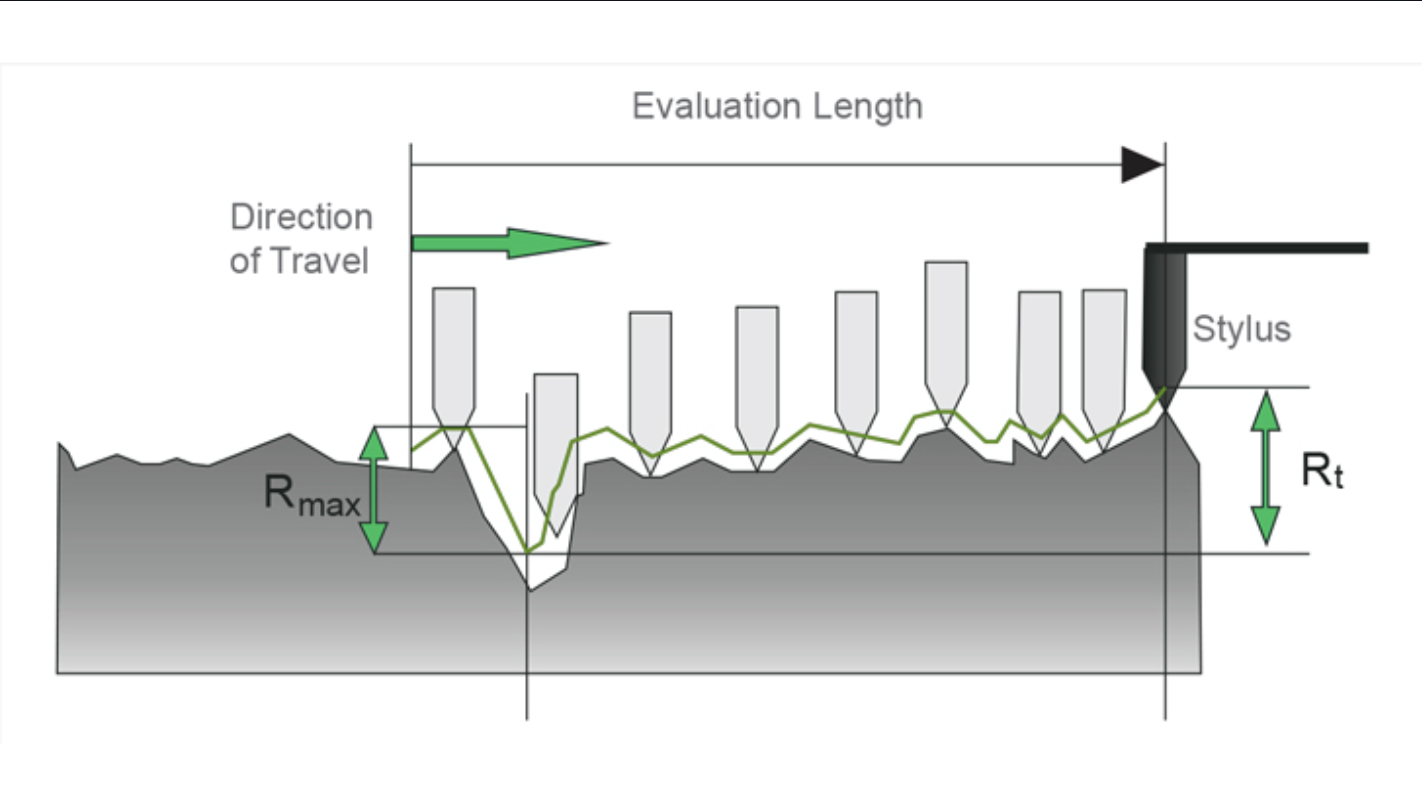
- Roughness: The fine-scale irregularities, measured as Ra (average roughness), Rz (average maximum height), or Rmax (maximum peak-to-valley distance). For instance, an Ra of 32 µin indicates a smooth but not mirror-like surface, ideal for non-critical parts.
- Waviness: Larger-scale deviations caused by machine vibrations or tool deflection, often measured over a longer sampling length than roughness.

These parameters are quantified using surface metrology, with two primary methods:
- Contact Method (Stylus): A diamond-tipped stylus traces the surface, measuring deviations with high precision. It’s widely used but can scratch soft materials like plastics.
- Non-Contact Method (Laser/Optical): Lasers or white light interferometry scan the surface, offering superior accuracy for delicate materials and complex geometries. This method is ideal for high-precision industries like aerospace or medical devices.
Example: In a recent project, a client machining titanium implants opted for non-contact laser measurement to ensure an Ra of 8 µin, avoiding stylus-induced micro-scratches that could compromise biocompatibility.
Choosing the right measurement method depends on your material, tolerances, and industry standards (e.g., ISO 4287 for roughness).

Your Surface Finishes Chart for CNC Machining
Here’s a quick-reference chart for common CNC surface finishes, tailored to popular materials and their applications:
| Finish Type | Ra (µin) | Material | Best For |
|---|---|---|---|
| As Machined | 125–250 | Aluminum, Steel | Non-critical surfaces, cost-effective |
| Bead Blasted | 32–125 | Stainless Steel, Plastics | Matte, uniform look |
| Polished | 8–16 | Brass, Acrylic | High-gloss, aesthetic parts |
| Anodized | 16–32 | Aluminum | Corrosion resistance, decorative |
Need a custom finish for a specific application? Reach out for expert guidance.
What Affects Surface Finish? 5 Key Factors
Achieving the perfect surface finish requires careful control of several variables. Here are the five most critical factors, with insights into how they impact your CNC project:
- Material Type: Material hardness and composition dictate achievable finishes. Hard materials like stainless steel or titanium can achieve Ra values as low as 4 µin with polishing, while softer plastics like ABS may struggle to go below 32 µin due to their tendency to deform under cutting forces.
- Cutting Tool Sharpness and Geometry: A sharp, high-quality tool with optimized geometry (e.g., positive rake angles for softer materials) reduces surface imperfections. For example, dull tools can cause material tearing, increasing roughness by up to 20%.
- Cutting Fluid: Fluids reduce friction and heat, preserving tool life and surface quality. Water-based fluids work well for aluminum, while oil-based fluids are better for stainless steel to prevent work hardening. Improper fluid selection can lead to burn marks or poor finishes.
- Feed Rate: Lower feed rates (e.g., 0.01 mm/rev) produce smoother surfaces by allowing the tool to make finer passes, but they increase machining time. For high-speed production, balancing feed rate with spindle speed is critical to avoid chatter marks.
- Depth of Cut: Shallow cuts (e.g., 0.1 mm) minimize tool deflection and heat buildup, resulting in smoother finishes. Deep cuts (e.g., 1 mm) are faster but can introduce vibrations, increasing waviness and roughness.
Case Study: A client machining 316 stainless steel for marine fittings reduced Ra from 63 µin to 16 µin by switching to a sharper carbide tool and optimizing feed rate to 0.015 mm/rev, improving corrosion resistance and aesthetics.

Mastering these factors requires experience and testing. Partnering with a skilled CNC shop can help you dial in the perfect parameters.
Surface Finish Symbols Explained
Surface finish symbols on technical drawings communicate precise requirements to machinists. These are standardized (e.g., per ASME Y14.36 or ISO 1302) and include metrics like:
- Ra (Average Roughness): The arithmetic average of surface irregularities, typically in microinches (µin) or micrometers (µm). For example, Ra 32 µin is common for general-purpose parts, while Ra 8 µin is used for high-precision optics.
- Rz (Average Maximum Height): The average of the five largest peak-to-valley distances across multiple sampling lengths. Rz is critical for parts under cyclic loading, as it highlights potential stress risers. For instance, an Rz of 100 µin may indicate a risk of fatigue failure in aerospace components.
- Rmax (Maximum Peak-to-Valley Distance): Measures the largest single peak-to-valley distance, sensitive to defects like burrs or scratches. Rmax is often specified for safety-critical parts, such as automotive brake components.
- Rp (Maximum Peak Height): Focuses on the highest peak, useful for surfaces requiring specific coating adhesion properties.
- Rv (Maximum Valley Depth): Measures the deepest valley, critical for parts where lubricant retention is key, like hydraulic pistons.
 Drawings may also specify lay direction (e.g., “=“ for parallel lay) and tolerances (e.g., Ra 16–32 µin). Misinterpreting these can lead to costly rejections. For complex parts, 3D surface profilometry may be used to map the entire surface, ensuring compliance with specs.
Example: An automotive client specified Ra 16 µin and Rz 80 µin for a transmission gear. By using a combination of grinding and polishing, the shop achieved compliance, reducing friction and extending gear life by 15%.
Confused by surface finish specs? Talk to our team to ensure your drawings translate into perfect parts.
How to Pick the Perfect Surface Finish
Choosing a surface finish is a balance of function, aesthetics, and cost. Follow these steps:
- Define Requirements: Does your part need low friction (e.g., for bearings) or high corrosion resistance (e.g., for marine hardware)?
- Match Material and Process: Verify which finishes are feasible for your material and machining method.
- Consider Cost: Ultra-smooth finishes (Ra < 8 µin) require additional processes like polishing, increasing costs by 20–50%.
- Consult Experts: XTJ precision Mfg can recommend finishes based on industry standards and your budget.
FAQ: Surface Finishes for CNC Machining
What’s a steel surface finish chart?
It’s a guide showing common surface finishes for steel, with roughness values and visual characteristics. It’s a reference for selecting finishes, not a strict standard.
What’s a plastic surface finish chart?
This chart lists finishes for plastic parts, like matte or glossy, with Ra values and ideal applications.
What does a 32 surface finish mean?
It refers to an average roughness (Ra) of 32 microinches—a smooth, cost-effective finish for non-critical surfaces.
How do I choose a surface finish?
Consider function, aesthetics, and budget. For complex projects, consult a machining expert to align with industry standards.


